Thursday, July 01, 2010
Ian's Guide to Photographing Iridium Flares
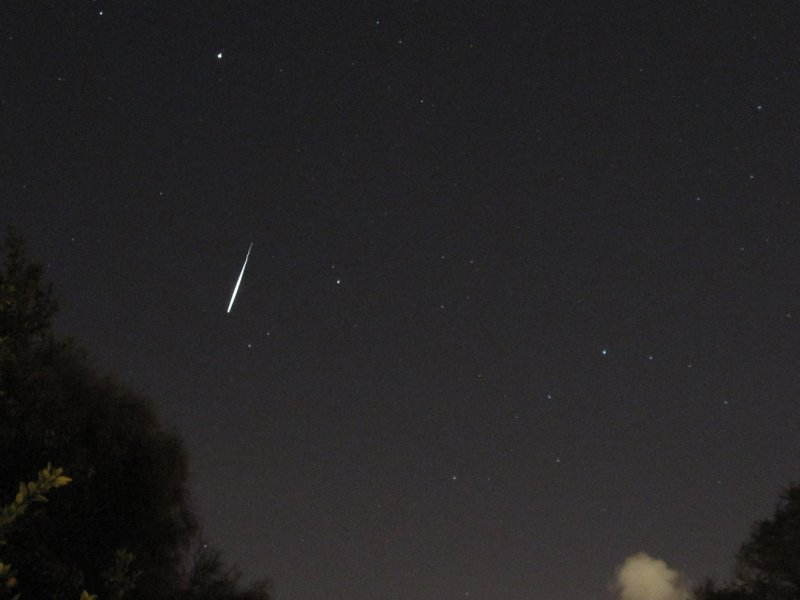 Iridium flare caught at 17:12 in Adelaide 0n 30 June passing below Arcturus. Canon IXUS 100 IS, 15 second exposure, 400 ASA. Click to embiggen
Iridium flares occur when sunlight catches the reflective antenna of the iridium satellites. They are pretty spectacular to observe, but, unlike the now bright International Space Station, the flares last a very short time. They are a challenge to spot, and a challenge to photograph.
My guide to taking images of Iridium Flares
1) Subscribe to CalSky's email Iridium flare alerts. I love Heavens Above, and they are my go-to page for all other satellites, but CalSky actualy gives you skymaps of where the flare will be. It means I don't have to download the TLE files for the iridium satellites in SkyMap and compare them to the Heavens Above time predictions.
 Iridium flare just missed in Adelaide passing below beta Centauri (you will need to click to see the faint, post flare trail). Canon IXUS 100 IS, 15 second exposure, 200 ASA.
 2) Get a timepiece with accurate timing and seconds display. I use my bush-walking GPS, whose timing is corrected by the GPS satellites and which displays time down to seconds and has back lighting so I can see the time display in the dark.
You really need this when a flare may last between 10-30 seconds. Your mobile phone will not cut it, neither will running in to your computer to check your hyper-accurate atomic clock adjusted computer clock.
3) Be really anally retentive about timing. I check the expected flare maximum time, subtract half my exposure time (15 seconds max to get the best trail, 1 5seonds is the longest exposure with the Canon IXUS) and the 2 second shutter opening delay (to avoid tripod shudder as I activate the shutter) so that I have bracketed the flare as well as possible.
4) Get out and set up well ahead of the flare, you can't rush out at the last minute and expect to set up in time.
5) Make sure you are pressing the right buttons. In the top image (with a decent flare shot), I accidentally pressed the "off" button next to the shutter button, so the camera turned off and all my settings evaporated. Luckily I was able to get most of the flare with a hasty turn-on and reset.
6) Don't talk to your mother on your mobile while waiting for a flare, you will be distracted and press the button at the wrong time. The lower image shows the result of that.
Just follow these simple rules and you can catch iridium flares. Mostly ... well sometimes. So long as your mother doesn't call.
Labels: astrophotography, Satellite
# posted by Ian Musgrave @ 6:00 am 
Comments:
<< Home
Interesting post BTW. I've enjoyed iridium flares in the past via heavens above but never thought to try and take pics.
# posted by  : 9:57 pm
: 9:57 pm 
Clearly, I am missing something important on Cal-Sky's site. Total novice here. Does that site give you an option to enter your location like Heavens Above does? Tried to look for our first Iridium Flare tonight, but with no luck. Does azimuth refer to the direction in the sky we must face?
Yes, there is a way to customize it for your location. Click on Intro
http://www.calsky.com/cs.cgi/Intro? and it will allow you to set it up for your location.
Azimuth is the direction you should be pointing in, but the star char should help you orient yourself better. You may have to mess around with the str charts a bit if you are unfamiliar with the night sky, or use Heavens Aboves maps :-0
Post a Comment
http://www.calsky.com/cs.cgi/Intro? and it will allow you to set it up for your location.
Azimuth is the direction you should be pointing in, but the star char should help you orient yourself better. You may have to mess around with the str charts a bit if you are unfamiliar with the night sky, or use Heavens Aboves maps :-0
<< Home
![]()

 Click to read about or order
 Click to read about or order
 Click to read about or order
 Click to read about or order


