Sunday, July 08, 2007
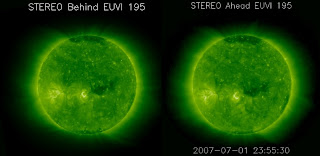
Stereo Anaglyph of the Sun
 Image credit STEREO.
I've written before about making stereo images from the STEREO SECCHI beacon images. For the image to the left, all you have to do is cross your eyes, until the images are superimposed, and viola! A 3D image appears. To make this kind of image, you basically just need to copy the ahead and behind images align them and place
 them relatively close together, and you have a 3D image. I say basically, as the ahead images are bigger that the behind images, you have to rescale them. I download 512x512 images and rescale the ahead image to 455 x 455. Also, if you are downloading images other than those on the beacon images page, make sure you download images with the same date stamp as the beacon images, otherwise the features on the Sun won't link up properly.
The lower image on the left is a stereo anaglyph of the Sun. For these images you need coloured spectacles, with one red and one blue panel (like they give out at 3D movies). While the "crossing eyes" 3D image doesn't require any hardware, many people just can't cross their eyes to form stereo images, and anaglyphs work for everybody. Anyway, this image was created using the Gimp. I was alerted to this use of the Gimp by Peter Tagatac of Top of the Lawn, but never had an astronomical use for it until now.
The full details of how to make an anaglyph with the Gimp is in this tutorial, so I won't repeat them here, but just point out some STEREO specific issues. As for the "crossed eyes" version, you will need to rescale the ahead image (and make sure you have the matching ahead and behind images). As well, it's important that the ahead image is the cyan filtered image, and the behind is the red filtered image (otherwise the 3D effect is mucked up). You will also need to overlay the images. After you have followed the tutorial instructions to create the red and cyan layers, turn the colour layers off, select the top image layer and set the layer attribute to difference, then move the top layer until the images are aligned. Then return the layer attribute to normal, restore the colour layers and proceed as with the tutorial.
Labels: anaglyph, Stereo Satellite, stereograms, Sun


 Click to read about or order
 Click to read about or order
 Click to read about or order
 Click to read about or order