Saturday, April 24, 2010
Using The Gimp for Astrophotography (Part 1)
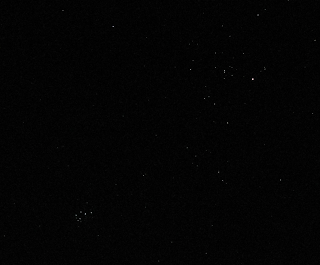
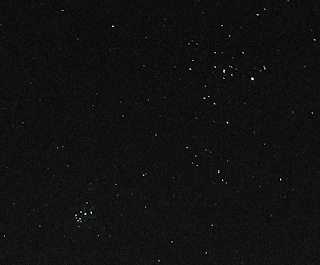
Left image: Single shot using a Canon IXUS, with an 8 second exposure at ISO 400. Right image: Composite image of 5 stacked images taken under the same conditions as image one, stacked in The Gimp (click to embiggen).
Last Sunday on Weekends with Ashley Walsh, in the computer show they were discussing programs for digital photography, and someone rang up about astrophotography. This spurred me to complete an article that I've been writing forever about using the Gimp for astrophotography. This is the first installment, based on the query to the computer program. Even simple "point and shoot" digital cameras can get good results.
With the advent of affordable digital cameras, webcams and even mobile phone cameras, amateur astrophotography has exploded. Most digital astronomy images need some degree of post processing to bring out their best, and programs such as Photoshop and PaintShop Pro have been pressed into service with remarkable results. However, the open source movement has produced some equally remarkable, and above all free, software, and one of these is The Gimp.
While The Gimp isn’t Adobe Photoshop, it’s pretty close in many respects, and can do almost anything an amateur wants to do. And as a free program, you can’t beat the price. Astrophotography post processing can be broadly divided into a small number of themes. Stacking and adjusting stacked images, stitching images together to make a larger image (such as constructing a full lunar image from smaller segments) and making animations. The Gimp is very useful for all of these, although for automatic stacking and registration of hundreds of images from CCD cameras you are better off with a dedicated program like Registax.
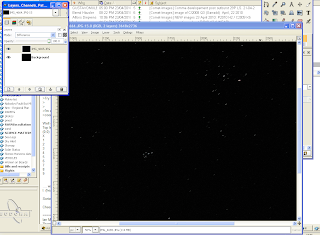
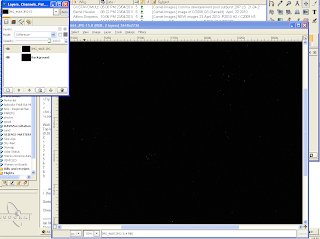
Left image, two shots overlaid using the "difference" function of the Gimp. Right Image: Image in difference mode when images have been aligned.
I’ll start off with the simplest task, preparing a single image using a digital camera in The Gimp. You may be surprised to learn that ordinary, cheap, "point and shoot" digital cameras are perfectly capable of taking decent sky shots. Simple ones, like my Olympus mu 300 don’t have the ability to take timed exposure's but most of these cameras have a nightmode that will allow you to take up to 6 second exposures. This is more than adequate for taking images of the Moon, conjunctions of bright planets,and so on. More advanced digital cameras like my Canon IXUS can do timed exposures (the Canon can do up to 15 seconds). If you do have a camera with a timer function, don't go over 10 seconds exposure or the stars will start trailing.
So the first thing you need to do is take some photos. You need a camera of course, and a tripod of some sort to keep the camera steady. I have both a standard camera tripod, and one of those little portable tripods for use hiking etc. The images in this post were taken on one of those little portable tripods. These images were taken simply by pointing the camera at the sky and taking a shot, no binoculars or telescopes involved, and yes, that's the Pleiades cluster at decent magnification taken with a simple point and shoot camera (I'll discuss telescope/binocular imaging in future posts).
For stacking I take up to 6-8 images, depending on the circumstances. Quite often only 4 images will suffice, but extras are good in case of misfires, or if I want to make an animation. If your camera shows "hot" pixels, pixels which are permanently on (you'll see them as bright, single pixels where stars aren't on your images), then you need to take a dark frame, this is an image that is identical to the other exposures, but with the camera lens covered.
Once you have your images, and transferred them to hard disk or whatever storage medium you want, open The Gimp. Make sure the "layers, channels paths" panel is open It's normally opened by default, if not File | Dialogs | Create New Dock | Layers, Channels, Paths will open it.
The open the first of you sequence of images. You will note it appears in Layers window as a thumbnail labeled "background". If you have "hot pixels" , use the dialog
File | Open as layers. This image then appears as a highlighted thumbnail in the Layers window. In the Mode dropdown box in the layers menu, choose "subtract". The save the resulting image with a new file name. Repeat this for each image you want to stack (you can create scripts to do this, but we will cover this later).
Once you have all your images processed for hot pixels (or if your images don't have enough hot pixels to worry about), open the first image in the sequence you want to stack as before (the processed ones if you have hot pixels). Again note that it is labeled "background), again do the File | Open as layers to get the next image in the sequence. This time, in the Mode drop down you choose "difference" (see left image above, you will have to enlarge it to see the detail). Both images now appear overlaid. Why are they not on top already? Because in the 6-6 seconds you took obtaining that image, Earths rotation has moved the stars sufficiently so they are no longer in the same spot. For best overlay results, you may wish to enlarge the images using View | Zoom.
Choose the move icon in the main Gimp panel, then click on the image and use the arrow keys to move the images around until they are on top of each other. With the "difference" mode, you know this occurs when the images disappear (see right hand panel above). Now change the mode to "addition" and instantly the stars are brighter.
Open your next image in the sequence using File | Open as layers and repeat as before. Continue with all your images or until the stars are sufficiently bright. You will notice that while some stars are prefectly aligned, stas far from those you aligned trail a bit. That is because the sky is a sphere, and the stars are rotating as they move. You can fix this using the rotation tool, but that's a bit painful, just live with a bit of trailing for now until you have some experience stacking the images.
Now you have you assembled image, save it in the format you want and Robert is your avuncular relative, an nice sky shot, almost as good as with expensive cameras! (go back and check the top right hand image)
Next week, animations.
Labels: astrophotography
Comments:
<< Home
Just "GIMP", not "The GIMP". It stands for GNU Image Manipulation Program".
You can do the same thing in any program, such as PhotoShop, that does a "difference" filter with stacked images.
You can do the same thing in any program, such as PhotoShop, that does a "difference" filter with stacked images.
Err, yeah, that's what I said, but The GIMP is free (which was the point of the post), while photoshop and PaintShopPro are not.
I love GIMP, I also use Photoshop for Astrophotography and everything that I can do in Photoshop I can do in GIMP. For stacking I use a free program called DeepskyStacker and process using GIMP/PS.
Gimp is an excellent tool and I've been using it a while but thanks to you the last time I went bush I specifically took some photos to stack them like you suggested...
And it worked. They're not great photos but as a first attempt goes I'm tickled (photos on my blog).
Thanks for the tip.
And it worked. They're not great photos but as a first attempt goes I'm tickled (photos on my blog).
Thanks for the tip.
Nice photos Shane, very nice indeed, and you have discovered that the sky is a sphere! The sky rotates in your field of view, not merely moves, so if you align one set of stars, others further away will not be aligned because of the sphericity.
So for broad scale photos, not only do you have to align the photos, but you have to rotate them as well (which is a right pain)
So for broad scale photos, not only do you have to align the photos, but you have to rotate them as well (which is a right pain)
Umm, now that I've seen you photos Shane, I better put in a post talking about rotating broad scale images.
Thanks for the feedback Ian. I've fixed the image. I rotated each layer, and it was a pain, but I think the photo looks far better now. Thanks again.
Shane; "pain" does not describe it adequately, especially when you have 3 or more images. But your perseverance has resulted in a very nice image indeed. I'm still going to do a follow up post though, after tonights eclipse.
Thanks! Very useful. I've been shooting Comet Garradd and the Supernova in M101 and stacking using GIMP helps!
All in all, it's a nice effort. But just, as it is a real, real shame Linux (the majority of scientists' choice for OS) doesn't offer a real, proper easy-to-install (unlike Siril!) image-stacking program to attend the thousands of amateur astronomers whom, for serious work, feel more and more compelled to get back to Windows. :-(
Post a Comment
<< Home




 Click to read about or order
 Click to read about or order
 Click to read about or order
 Click to read about or order


