Monday, January 21, 2019
Photographing the Perigee ("Super") Moon of January 21, 2019
 |  |
| Comparison of this months Perigee Full Moon with the apogee full Moon on September 13 | A selection of different adapters, from left to right camera adapter, mobile phone adapter and a 25 mm lens |
There has been a lot of excitement on the internet of tonight's "Super Moon" because from the US and Europe it occurs at the same time as a total Lunar Eclipse (Getting it called a "Super Blood Wolf Moon"). We won't see the eclipse in Australia, we had our "Super Blue Moon" eclipse last year, but we will get to see the Perigee Syzygy Moon in all its glory.
So what will you see? While the Moon's size is really obvious in a telescope, visually it is very hard to see the difference between this Full Moon and the one before even if you have fantastic eyesight. Indeed telling the difference between this perigee Moon and the following apogee Moon on 13 September will be very difficult.
In both cases, the Moon is around half the width of your finger, and a mere 4' (that's minutes of arc, about 4 human hairs in width) different in size. This is around the limit of what humans can distinguish. If you have great eyesight and a great memory you will be able to distinguish between the January and August full Moons, but otherwise, no.
As well, unless you have a REALLY good memory, you will be comparing it with the full Moon the month beforehand, when it was almost identical in diameter, that is not much different at all.
That doesn't mean you shouldn't look though, Daniel Fischer has been able to see the difference, you can read his account and viewing tips here
http://earthsky.org/space/can-you-discern-supermoons-large-size-with-the-eye-an-observer-says-yes
However, it will be a good photo opportunity, if you have a decent zoom on your DSLR camera or access to a small telescope. If you do have access to a telescope and you take an image on January 21, then take a photo of the Moon on September 13 you will see a decent difference (you need to use exactly the same zoom enlargement, see Inconstant Moon for general instructions). In the past, I have used a simple point and shoot camera with an adapter for moon imaging as well as a DSLR. But what if you don't have these kinds of cameras? The solution is the mobile phone.
Modern mobile phones have amazing imaging ability. You can get decent images just by holding your mobile phone to the lens of the telescope. But this can be an exercise in frustration as you try and align the mobile phone lens with the telescope lens aperture.
 |  |
| The Mead mobile phone adapter | Mead mobile phone adapter with 25 mm lens in place |
However, if you already have a tripod adapter for the mobile phone, you can use it with a telescope camera adapter (top right image, far left adapter). You can also get a dedicated mobile phone adapter, there are several out there of varying prices (see here, here, here and here). I have a Meade adapter. It is mildly annoying but is good for my phone which has a very off centre lens.
You simply attach the adapter to the lens of your choice. I suggest a wide field lens like a 25 mm. It allows you to fit the whole moon in and is very forgiving if your scope and finder scope are slightly out of alignment.
 |  |
| Assembled with the mobile phone in place, alignment needs to be adjusted | Assembled on telescope |
One the phone is assembled on the adapter you will need to adjust the alignment so the entire aperture is visible in the phone, then you can pop the assembly on the telescope. If I am doing this at night, I use my red-light torch to set up the alignment before assembly by shining it into the lens (trying to do in on the scope is an exercise in frustration).
Hint: make sure you do this over a soft surface if the phone falls off it won't smash then.
For a full Moon, you shouldn't need to go from manual to auto. But it is more satisfying if you do. Most mobiles now have a full suite of manual settings (the location of the manual controls are very variable between mobile phones, check yours out in advance). Change autofocus to manual and use the landscape/infinity setting. Choose an iso around 400 and a shutter speed as fast as possible the give you a decent image (I use around 1/1000 to 1/2000 sec).
Unless you have a guided scope the Moons image will drift so a rapid shutter speed will reduce the blurring. Even with a guided scope fats shutter speeds will give sharper images due to reduced atmospheric blurring.
 |  |
| "Super Blue Moon" Total Lunar eclipse of 1 February 1:12 am. Sony Xepria 1/500th sec exposure ASA 400. This is a perigee Moon | "Mini Moon" Total Lunar Eclipse of 28 July, 4:25 am. Sony Xepria 1/2000th sec exposure ASA 400. This is an apogee Moon. Note the clear difference in size between the two (same image scale and zoom factor) |
The images above were taken with my Sony Xperia mobile phone.
Don't worry if you can't nip down to your local astronomy shop today to get an adaptor, try the holding the phone up to the lens arrangement as a practice for the February 19 perigee Moon, and purchase an adapter after you have done a bit of research on prices.
With an adapter, you can broaden you astrophotography horizons so much (eclipses and some of the brighter clusters are now accessible to you)
Labels: astrophotography, mobile Phone, Moon, perigee, where to look

Saturday, January 26, 2013
This Australia Day 2013, Find The Southern Cross

The Southern Cross is a Southern Hemisphere icon, and it appears as a central part of the Australian flag. However, many people would not be able to find the Southern Cross in the sky with confidence.
This Australia Day, when you are out getting ready to watch the Australia Day fireworks, is an excellent time to locate the constellation.
First you need to locate South. If you don't know which way south is at your local fireworks venue, then use a street directory (whose pages are oriented north-south, south is the bottom of the page) or Google Maps, to find where south is in relation to the nearby streets. Otherwise, south is to the left of Sunset.
Most of the fireworks will be around 9-9:30 to be family friendly but still be dark enough to see the fireworks.
Look south, about two handspans left from due south, and a bit over one handspan up (where a handspan is the with of your hand when making a "stop" sign with your arm fully outstretched) you will see a pair of bright stars, these are the pointers. A further handspan up and a bit over a handspan to the left you will see a cross shaped group of stars (see diagram above).
That's the Southern Cross. Now you can enjoy the fireworks knowing you have found the inspiration for our flag.
Labels: constellations, unaided eye, where to look
Sunday, January 13, 2013
Guided by the Light; Using the Moon to find the Bright Planets
 |  |
| Jupiter, Aldebaran and the Moon as seen from Adelaide, Australia on January 22, 2013 at 10 pm local daylight saving time, looking north. Similar views will be seen from the Southern hemisphere. The Moon's size has been exaggerated for ease of viewing (click on any image to embiggen). | Jupiter, Aldebaran and the Moon as seen from Roswell, New Mexico on January 21, 2013 at 10 pm local time, looking South near the zenith. Similar views will be seen from the Northern hemisphere. The Moon's size has been exaggerated for ease of viewing (it looks like the Moon is covering Jupiter, but it doesn't). |
Finding the bright planets (Mercury, Venus, Mars, Jupiter and Saturn) should be relatively easy as they are, well, bright. But as a beginner, how do you tell them from all the bright stars in the sky? Most newspapers publish rise set times for planets, but from there you can only work out the general area in the sky they will be. A good guide is that, in general, stars twinkle and planets don't. But on a still night this doesn't help (and there is a lot of sky to scan.
You can buy any number of sky charts, but they can be confusing to start off with when you are still a little unfamiliar with the sky, and the star formations are unfamiliar (by the way, I use Stellarium, a free photo-realistic sky planetarium program, it's fantastic for sky gazing. A guide to using Stellarium and some of the cool things it can do is here).
So what is a REALLY recognisable object, that is easy to find, and is close to the planets sometimes? The Moon of course. The Moon comes close to each of the bright planets at least once a month, so if you can identify the Moon, then if you know when the Moon and the bright planets are close, then it's a cinch. As well, the Moon and bright planets can form really lovely patterns in the sky.
But, of course, you need to have a list of times when the Moon is close to the bright planets. Luckily, I have one here. Of course, it is set up for Australia. As Australia is 8-10 hours ahead of Universal Time, for places behind UT (like the Americas) the occurrence will be the day before.
As an example, in about a weeks time on the 22nd of January in Australia, the Moon will be close to the planet Jupiter (see the diagram above) and make a nice formation with Jupiter and the bright star Aldebaran. For the America's this event will take place on the 21st (with the Moon really close to Jupiter). The presence of Aldebaran may be confusing, but it is a red star, while Jupiter will be a golden yellow, and the brighter of the two. Generally, the brightest object closest the Moon is the planet (Mars far from opposition is the exception).
Similarly, on February 4th in Australia, the Moon is close to Saturn, people in the Americas will see this on the 3rd, their time (see below).
People in the northern hemisphere will have a reversed view from those in the southern hemisphere, but in terms of finding things close to the Moon, this doesn't matter.
After you have identified the planets with the Moon, you can use this knowledge to spot them on subsequent nights. Of course, the planets move, but slowly, so shortly you can become familiar enough with the sky to locate them with ease.
Only Jupiter, Saturn and Venus are visible at the moment, Mars and Mercury are hidden by the Sun. However, over the coming mnths there will be several good planet/Moon enocunters, so it is worth looking out for them.
 |  |
| Saturn and the Moon as seen from Adelaide, Australia on February 4, 2013 at 3 am local daylight saving time, looking east. Similar views will be seen from the Southern hemisphere. The Moon's size has been exaggerated for ease of viewing. | Saturn and the Moon as seen from Roswell, New Mexico on February 3, 2013 at 3 am local time, looking East. Similar views will be seen from the Northern hemisphere. The Moon's size has been exaggerated for ease of viewing. |
Labels: Jupiter, Moon, Saturn, unaided eye, unaided eye observation, where to look
Wednesday, December 30, 2009
So you got a telescope for Christmas ... what next?
This post was inspired by an email from a reader. Having received a spanking new telescope for Christmas, and having successfully assembled it, despite the instructions looking like they were photocopied onto recycled rice paper using a 1980's photocopier. So there it is, bright, shiny, bursting with potential. What planet or star should you look at first?
The Moon. The Moon is big, bright easy to find, and has lots of interesting features. It is perfect for getting familiar with the intricacies of your new scope, and circumventing the problems that can cause people to hurl the scope into a garage and leave it to gather dust for the next century.
Actually, first off, take it out in the afternoon and set it up in the light where you can see all the bolts and cables, so you can see what you are doing. make sure you are somewhere where you can't accidentally see the Sun through your scope. Nothing ruins a Christmas present more than if it sends you blind.
Make sure you tighten up all the bolts especially those in the tripod mounting. A lot of frustration occurs when the telescope wobbles so much you can't focus or any time you look through the scope the objects jiggle to much see anything. Also make sure the knobs that hold the finderscope to the telescope tube are tight, if the finderscope moves around it can cause no end of grief. Then put the lowest power eyepiece in the scopes tube.
Now to tackle the thing that engenders the most frustration of all, aligning the finderscope with the telescope. Point the telescope more or less in the direction of something distant, like a telegraph pole. Look through the finder scope and adjust the alt-azimuth movement knobs until the telegraph pole is centered in the cross hairs, then look though the eyepiece (low power, remember). If you are lucky, then at least a bit of the telegraph pole is visible through the eyepiece, if so use the movement knobs to centre the telegraph pole in the eyepiece. Then use the adjustment knobs of the finderscope to get the telegraph pole in the centre of the finderscope again. This way, the next time you point the finderscope at something, it should be more or less centered in the low power eyepiece (make sure you don't bang the finderscope out of alignment now, or there will be a lot of weeping and wailing and gnashing of teeth).
Now wait for twilight to fall and the Moon to rise. The Moon is waxing at the moment, and there are lots of nice craters and so on to see.
Keep the low power eyepiece in. I know everyone one wants to go high first off, but trust me.
Point the telescope in the direction of the Moon. Look through the finder scope and adjust the alt-azimuth movement knobs until the Moon is centered in the cross hairs (just like you did with the telegrapgh pole), then look though the eyepiece.
If you are lucky, then the fiddling with the telegraph pole you did earlier will result in at least a bit of the Moon is visible through the eyepiece (it won't be exact because the telegraph pole is much closer then the Moon, and the parallax will be different), if so use the movement knobs to centre the Moon in the eyepiece. Then use the adjustment knobs of the finderscope to get the moon in the centre of the finderscope again. Now, when you next go out astronomical objects will be more or less centered in the low power eyepiece.
If, as more likely, the Moon is NOT in the eye piece, then take the eyepiece out and see if you can see any Moon light coming down the tube. If not, first check to see that the lens cap is off the working end, then use the movement control know to slowly scan across the sky in the
general direction of the Moon until you can see Moonlight coming down the tube. Once that's happened, put the low power eyepiece back in and use to movement knobs to centre the Moon. Then go back to the finderscope and centre the Moon in that (you may have to juggle back and forth between the eyepiece and the scope if the alignment is really out).
Once the low power eye piece is set up, enjoy the lowpower view of the moon and practice using the movement knobs and the focus knobs. Getting used to setting up the focus can take some time. Then put in the higher power eyepiece, note where the Moon is (it will probably be out of focus in the high power lens, you will have to adjust it). Play around with the low and high power views getting used to using the focus knobs and the movement knobs and the finderscope. In the high power eyepieces, you will also note that the Moon will slowly (or rapidly depending on how powerful it is) move out of the field, so you need to constantly adjust the movement knobs.
Once you have had a good play with the Moon, it is time to go planet hunting. Unfortunately, the only planet visible in the evening at the moment is Jupiter (unless you really feel like getting up at 4 am to see Mars and Saturn), and its is low on the horizon. By the time you have finished playing with the Moon, Jupiter may have set.
Don't despair, next night, go out and play with the Moon again (just to refresh yourself and check that the finderscope has not been knocked out of alignment). Now look west. The obvious bright object above the western horizon is Jupiter, get it into the finderscope, first with the low power lens to make sure it is in view, and enjoy.
The Moon. The Moon is big, bright easy to find, and has lots of interesting features. It is perfect for getting familiar with the intricacies of your new scope, and circumventing the problems that can cause people to hurl the scope into a garage and leave it to gather dust for the next century.
Actually, first off, take it out in the afternoon and set it up in the light where you can see all the bolts and cables, so you can see what you are doing. make sure you are somewhere where you can't accidentally see the Sun through your scope. Nothing ruins a Christmas present more than if it sends you blind.
Make sure you tighten up all the bolts especially those in the tripod mounting. A lot of frustration occurs when the telescope wobbles so much you can't focus or any time you look through the scope the objects jiggle to much see anything. Also make sure the knobs that hold the finderscope to the telescope tube are tight, if the finderscope moves around it can cause no end of grief. Then put the lowest power eyepiece in the scopes tube.
Now to tackle the thing that engenders the most frustration of all, aligning the finderscope with the telescope. Point the telescope more or less in the direction of something distant, like a telegraph pole. Look through the finder scope and adjust the alt-azimuth movement knobs until the telegraph pole is centered in the cross hairs, then look though the eyepiece (low power, remember). If you are lucky, then at least a bit of the telegraph pole is visible through the eyepiece, if so use the movement knobs to centre the telegraph pole in the eyepiece. Then use the adjustment knobs of the finderscope to get the telegraph pole in the centre of the finderscope again. This way, the next time you point the finderscope at something, it should be more or less centered in the low power eyepiece (make sure you don't bang the finderscope out of alignment now, or there will be a lot of weeping and wailing and gnashing of teeth).
Now wait for twilight to fall and the Moon to rise. The Moon is waxing at the moment, and there are lots of nice craters and so on to see.
Keep the low power eyepiece in. I know everyone one wants to go high first off, but trust me.
Point the telescope in the direction of the Moon. Look through the finder scope and adjust the alt-azimuth movement knobs until the Moon is centered in the cross hairs (just like you did with the telegrapgh pole), then look though the eyepiece.
If you are lucky, then the fiddling with the telegraph pole you did earlier will result in at least a bit of the Moon is visible through the eyepiece (it won't be exact because the telegraph pole is much closer then the Moon, and the parallax will be different), if so use the movement knobs to centre the Moon in the eyepiece. Then use the adjustment knobs of the finderscope to get the moon in the centre of the finderscope again. Now, when you next go out astronomical objects will be more or less centered in the low power eyepiece.
If, as more likely, the Moon is NOT in the eye piece, then take the eyepiece out and see if you can see any Moon light coming down the tube. If not, first check to see that the lens cap is off the working end, then use the movement control know to slowly scan across the sky in the
general direction of the Moon until you can see Moonlight coming down the tube. Once that's happened, put the low power eyepiece back in and use to movement knobs to centre the Moon. Then go back to the finderscope and centre the Moon in that (you may have to juggle back and forth between the eyepiece and the scope if the alignment is really out).
Once the low power eye piece is set up, enjoy the lowpower view of the moon and practice using the movement knobs and the focus knobs. Getting used to setting up the focus can take some time. Then put in the higher power eyepiece, note where the Moon is (it will probably be out of focus in the high power lens, you will have to adjust it). Play around with the low and high power views getting used to using the focus knobs and the movement knobs and the finderscope. In the high power eyepieces, you will also note that the Moon will slowly (or rapidly depending on how powerful it is) move out of the field, so you need to constantly adjust the movement knobs.
Once you have had a good play with the Moon, it is time to go planet hunting. Unfortunately, the only planet visible in the evening at the moment is Jupiter (unless you really feel like getting up at 4 am to see Mars and Saturn), and its is low on the horizon. By the time you have finished playing with the Moon, Jupiter may have set.
Don't despair, next night, go out and play with the Moon again (just to refresh yourself and check that the finderscope has not been knocked out of alignment). Now look west. The obvious bright object above the western horizon is Jupiter, get it into the finderscope, first with the low power lens to make sure it is in view, and enjoy.
Labels: telescope, where to look
Saturday, September 12, 2009
Seeing the Moon in Daylight.


The Moon in daylight. Left image, standard photo, right image, photo through polaroid glasses.
As long time readers of this blog know, I'm very enthusiastic about getting people to see Venus and Jupiter in the daylight. But did you know you can see the Moon in the daylight?
Now the dedicated astronomer types here will be going "What do you mean? Of course you you can see the Moon in daylight". Some others of you will remember a nearly full Moon rising just before sunset.
But many people have never noticed the Moon in the daytime sky. The Moon is a lot paler in the daytime sky, and can often be easily missed or or its pale aspect mistaken for a cloud. Also, for most of us living in suburban and urban settings , the sky is often a narrow band broken up by buildings or other obstructions, so seeing anything in the sky is a bit haphazard if you don't know where to look.
And of course there is clouds, we won't talk about clouds.
As well, when the Moon is at is largest, near full, it is only in the daytime sky for a short time, low to the horizon. Even today, as I write, the nearly last quarter Moon is low in the daytime sky, two hours after sunrise. Still, overall the Moon is visible in the daytime sky for a fair amount of time between full and three days before new Moon. You can actually see the crescent Moon two days before new, but it is very close to the Sun, and much care is needed (and often binoculars). In the past, I've had to use daylight Venus to help me find the thin crescent!
To find the Moon in the daylight it helps to have a good idea of where it is at night. After full it is relatively easy, you can see where the Moon is just before Sunrise, and can keep an eye on it after Sunrise. In the daylight, a lot of the moons features are easier to see with the unaided eye, as they are not lost in the glare of the Moons brightness. You can use polaroid glasses or filters to help see the Moon. Unlike Venus, whose light is strongly polarised, using polaroid filters cam increase the contrast between the Moon and the sky quite significantly (the images above don't do the actual increase justice).
Before full, you can use a newspapers Moon rise and set times (often up the back) or set of astronomical tables (or tide time tables) to find when the Moon rises, and scan the sky (wearing polaroid glasses if you like) for the Moon. Or you could see where the Moon is the previous night just after sunset, then, remembering that the Moon is around two hand spans further on each night, look in the approximate position the Moon was the next day (but two hand spans over).
We often think that astronomical activities cease when the Sun rises, but for the Moon and bright planets, it's not really over. Happy Moon hunting!
This is the fifth of a planned series of posts on looking at the sky and how to find your way around it as a beginner.
First post: The Dark Adapted Eye.
Second post: Let the Moon be Your Guide
Third Post: Seeing the Emu.
Fourth Post: Cloudy, Cloudy Sky
Labels: Astronomy, Daylight, Moon, unaided eye observation, where to look
Friday, July 17, 2009
Let the Moon Be Your Guide!


Left: The Moon near Jupiter on Saturday night July 11 10:00 pm local time. Right: Moon near Mars, Venus, Aldebaran, Pleiades and Hyades a 6:00 am local time on Sunday Morning July 19.
This is the second of a planned series of posts on looking at the sky and how to find your way around it as a beginner.
Finding things in the sky can be confusing, sure you can get downloadable star maps, but trying to match up a host of bright points with the dots on the map can be a herculean task sometimes. Sometimes you need a signpost, something bright and obvious you can't mistake for anything else.
Like the Moon.
The Moon has the advantage of passing quite close to several interesting bright stras and all the planets, so if you know when the moon and a planet are close, you can readily pick the planet out, and memorise its location for future reference on another night the Moon isn't conveniently close. See the two examples above for locating bright planets near the Moon.
Of course, the Moon and Planets move, so you have to keep track of when the Moon is near something of interest. How do you do that? Southern Hemisphereians can keep track via Southern Skywatch or my Weekly Updates where I note which objects the Moon is close to, or you can use the Heavens Above star chart or the skyview cafe star chart or Google Sky.
After a while the sky will become quite familiar to you, and you can star using skycharts with confidence.
First post: The Dark Adapted Eye.
Labels: Moon, Observational Astronomy, unaided eye, unaided eye observation, where to look
Friday, June 19, 2009
A Dark Adapted Eye
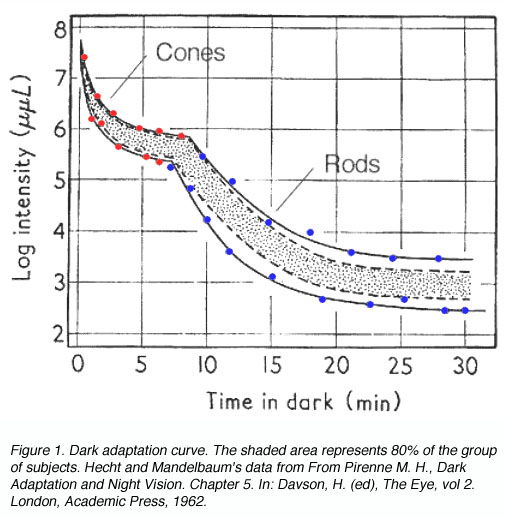
 If you were reading a particularly interesting article, say on how to find the constellation of the Emu [1], or about the Geminid meteor shower, and you get enthused so you walk outside ... and stand blinking in the dark. You can see a few bright points of light and if you are like me, a glowing square where you were staring at the computer screen, but the sky is a dark wasteland.
You have come up against the phenomena of dark adaption. Most people have encountered the phenomenon in the opposite direction, walking in from a brightly lit garden to indoors, for a moment you stand blinking in the dark.
Our eyes are amazing things. They can operate over a range of intensity of nine orders of magnitude. But they take time to adapt. In bright light the photopigments (rhodopopsins) are partially bleached, and they must be chemically regenerated [2]. It takes 30 minutes for eyes to become fully dark adapted, which is why amateur astronomers get so annoyed when someone turns on a torch, or heaven forfend, sweeps car headlights across them while they are observing. It will take at least half an hour before their eyes are as sensitive again.
If you are thinking, "Half an hour? What's the point of looking?", don't despair. For the casual observer, you only need six minutes to be able to see stars down to magnitude 5 or 6. This is more than enough to the see sky in its magnificence. If you want to see the faint, pretty clusters, or get the best out of meteor showers, then it's well worth waiting. Even from my suburban location, by waiting patiently I can see the Milky Way aching faintly overhead. And while you are waiting, you can spend your time gazing at the wonderful constellations of bright stars. Within a few minutes you can see enough stars to pick out most constellations.
I think this is part of the reason we are disconnected from the sky. Apart from the persuasive light pollution reducing the number of stars we can see, in the suburbs and the city we usually emerge briefly from brightly lit homes to take out the rubbish, feed the cat etc. Not enough time for us to adapt to the darkness even if we do look up.
If you have been staring at a computer screen for some time, there is little you can do to speed up the process of dark adaption. Oh, you could turn off all the lights inside and put a sheet of red cellophane over the screen [3], but that makes watching YouTube difficult and will raise concern from your housemates or partner (or both).
The best thing to do is to simply wait. I walk out into the back yard, make sure the backyard lights are off, and I close my eyes for a minute or so. Then I open my eyes and watch the sky unfold around me.
[1] Uh, what? There is no constellation of the Emu, you say. I'll tell you about it next week.
[2] there are also neural processes involved, but these are quite rapid compared to reversing the bleaching, for a full technical explanation see here.
[3] red light doesn't ruin your dark adaption, that's why amateur astronomers put red cellphane over their torches. So they can see stuff without ruining their dark adaption.
Labels: Astronomy, unaided eye, unaided eye observation, where to look



 Click to read about or order
 Click to read about or order
 Click to read about or order
 Click to read about or order